Create a Fun Abstract Color Wheel
September 10, 2009Step 1: Setting Up
Open a new AI file and select the View > Snap to Grid. Then set up guidelines by dragging the horizontal guideline from the top and the vertical guideline from the side to create a central point for your color wheel (turn the guidelines on/off with CMD + ;). Next, select the Ellipse Tool (L) and create an oblong shape. The shape will “snap” into place with the bottom anchor point resting on the central point of the guidelines. Select a fill color and no stroke.
Step 2: Convert Anchor Point
For this example, select the top anchor point of the shape. Now select the Convert Anchor Point Tool (Shift +C) and click on the top point which will cause the control handles to disappear and the shape will now have one end coming to a sharp point.
Step 3: Transparency
With the shape selected, go to Window > Transparency. When the window appears, choose Multiply from the dropdown menu and an Opacity level of 65% for the shape. This will create a color blend that looks like many overlapping “see-through” shapes. Then Select > Deselect. Select the shape layer again.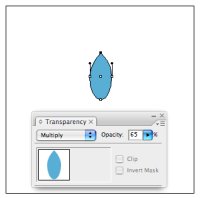
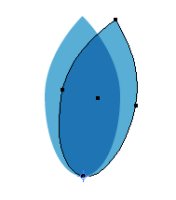
Step 4: Rotate and Copy
Next, choose the Rotate Tool (R) from the Tools panel. Then click on the bottom anchor point while holding down the Option/ALT key. This will bring up the Rotate window. For this example, enter an angle of -12º and click on the Copy button (not the OK button). This will create a copy of the shape (including the transparency) and rotate the shape 12 degrees.
Step 5: Transform Again...and Again
With the new rotated shape selected, you can either choose Object > Transform > Transform Again or Cmd+D (Tip: Hold the CMD key and keep clicking the letter D a total of 28 times to complete the vector color wheel example).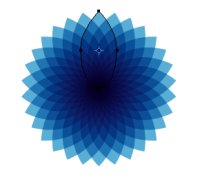
The abstract vector color wheels can vary by color and by shape. I kept the path shapes highlighted to show the original shapes. In the first example, I altered the original shape by changing the direction of one of the anchor points to create a sunflower. With the second example, I created three sizes of fuchsia circles with vertical tips (start with a perfect circle and convert the top and bottom anchor points like before) and added them together with the Pathfinder > Shape Modes > Add to Shape Area function. Finally, I chose a square for the third example, rotated the square on a corner, and changed each of the square copies to a different color shade to create a “geometric” rainbow wheel.

Create endless combinations by simply using different angles and shapes. The results are limitless.
Help bring in :- Shutterstock.com ; Tips n trics article
Posted by Iqbal Hossan.
 My name is Md. Iqbal Hossan. My job as an graphics and web designer began in 2005. Since then I worked with almost every company “flavors”. I did it enough times to realize that, no matter if its a big a corporation or a small the company, at the end of the day it’s all about human beings. And I really like that!
In 2008 the demand of work was greater that I could handle. I hired 2 assistants and this was the beginning of the ASD, that now counts with 12 professionals.
I have a very simple base for my work: “The human being as the measure of all things”. I don’t make design for products, I make design for people.
My name is Md. Iqbal Hossan. My job as an graphics and web designer began in 2005. Since then I worked with almost every company “flavors”. I did it enough times to realize that, no matter if its a big a corporation or a small the company, at the end of the day it’s all about human beings. And I really like that!
In 2008 the demand of work was greater that I could handle. I hired 2 assistants and this was the beginning of the ASD, that now counts with 12 professionals.
I have a very simple base for my work: “The human being as the measure of all things”. I don’t make design for products, I make design for people.